RV Plumbing
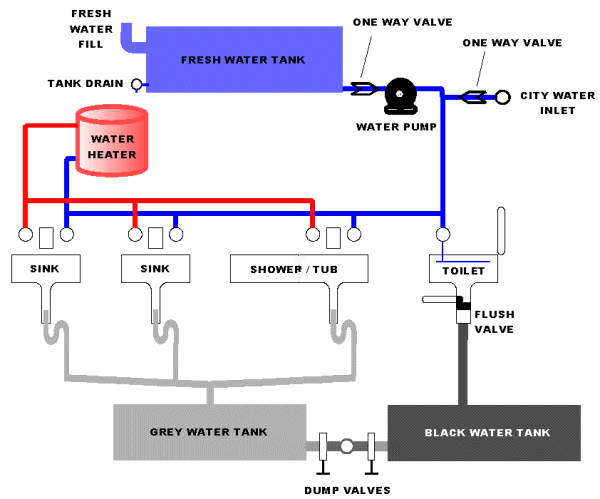
RV Plumbing isn't that much different from a traditional house type plumbing system. However, the generic RV Plumbing diagram below will help clear up a few issues.
If you find you need an actual RV Water schematic for your particular model, best to contact the manufacturer directly.

Fresh Water
Fresh water for your RV can be obtained 2 different ways. If you are
hooked up to city water, it goes directly into the various lines within
your RV and feeds water directly. We strongly encourage at least a basic water filter. It will keep small debris out of your water pump - it's designed to pump water - not debris!
If you are NOT hooked up to city water, the fresh water tank must be filled to store fresh water for you. Then when you turn your faucet on, water will come out! Between the fresh water tank and your various water outlets will be a 12 Volt DC Water Pump that pulls water from your tank and pressurizes your water lines - just like city water.
This water pump will have an on/off switch to start things. Depending on how your system is set up, most will have an air accumulator tank that will keep a certain amount of pressure within your system, before it gets too low and then requires the pump to cycle on. The beauty of the air accumulator is that is cycles the pump less frequently. You will always have a minimum of water pressure available to you.
Obviously, as you pull water from your tank, it is getting empty! Boondocking length of time will be directly related to your water reserve (usage!).
Some RV'ers will always fill their fresh water tank and draw needs from that - even if hooked to city water. That will become a matter of personal preference.
Much easier to remember to turn off the pump than walking around to the side of the RV and turning off the city water supply valve.
Water can be very damaging if allowed to get out of the tank or water lines, by mistake!!
If you are hooked to city water and leaving your RV, we strongly recommend turning off your water at the city inlet.
If you are using water from your tank instead - always turn the pump switch off, prior to leaving!
It has happened to many people - they come home to open their RV door and a flood of water gushes out! Opps!!!!!
A serious
RV Plumbing mistake!!
Grey Water Tank

As the drawing at the top shows, all your various water drains will go to the Grey Tank. This tank can be/should be largest of the 2 waste tanks because it gets filled from the shower, sinks and kitchen drains. The Grey Water Tank will have a roof vent to keep any odors away.
This tank will have it's own Waste Gate Valve to drain it.
The shape of both the Black and Grey Tank is such that it has a "low point" in it to facilitate it draining quickly. This picture doesn't show a vent hole, but it does have one. The purpose is to show the drain area design of an RV Plumbing waste system.
Great Video About Dumping Them!
Black Water Tank
The Black Water Waste Tank is a nice way of saying your toilet storage tank. Your RV is designed so only toilet waste is put into it.
The Black Waste Dump Tank will have it's own Waste Gate Valve to empty that tank. It will usually have a fresh water clean-out valve so your Black Tank can be rinsed out with fresh water, after draining it.
Take a look at our RV Toilet page to learn all about it and your Black Water Waste Tank
Tips and Tricks
1. Always turn your water supply off when leaving your RV!
2. Common Drain Hose for both Black and Grey Tanks - After securing drain hose, always "test" the drain connections with some Grey Tank Waste FIRST! Then, drain the Black tank. Use the remainder of your Grey Tank Waste to clean the inside of your drain hose.
3.NEVER turn on your hot water heater unless you are positive it has water pressure from either city or your fresh water tank. Always let some hot water out of a faucet to be sure there isn't an air bubble.
4. Be sure to use a Pressure Regulator on your incoming lines BEFORE the water enters your RV Plumbing system from a city/campground source. Your RV is a rolling earthquake for all those fittings! City water pressure could easily be too high for your RV's system (40-55 lbs pressure MAX!) We have the pressure regulator shown to your right - available through Amazon, it works very well and you always know that your water pressure hoses are safe from too much pressure. We broke an older smaller type one and "assumed" we wouldn't need one in an RV Park in San Antonio - their pressure should be fine!?!?! Guess what, about 2 hours later, we had a leak under the bathroom sink - into a cabinet full of "stuff"! We've had this regulator ever since!!!
Yup, not cheap, but it sure is solid and trustworthy! Just "talking" to a plumber will be more than this valve costs!!!!
5. As discussed on the RV Utilities page - NEVER put ANY water into your fresh water tank from a hose/spigot near a dump site!!
Monitor System for Utility Tanks
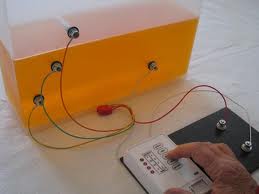
The three main holding tanks - fresh water, gray and black (sewer) all will have a similar system to tell the RV'er how much fluid is in the tanks. Unfortunately, the system is not real accurate. As the picture to the left shows, it usually will have 3 or 4 "sensors" in the side of the tank. As each sensor becomes "activated" with fluid, it changes the monitor display inside the RV to indicate how full/empty the tanks are. As a result, if a tank sensor is "just missing" the level in the tank, it will give a false impression to the owner. We've all come to "not rely" 100% on the display.
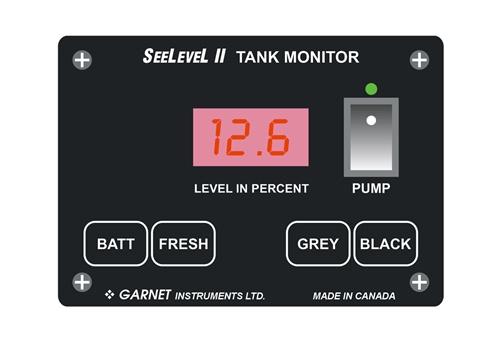
A "newer" system is a See Level Monitor System with Strip Sensor Devices that are incredibly accurate and tell you instantly what you really have within your system.
Take a look at this link for a great source for the See Level Monitor System.
Updating your system if it breaks or is not too accurate isn't difficult at all, if you have access to your tanks. Usually, the monitoring system is just inside a side door panel?
How to Calibrate Your Monitoring System, if it has adjusting Pods.
Here is an excellent video, featured in the RV Travel Newsletter (Feb, 2012) that was put together by the "RV Geeks". They are exactly what they imply - Geeks in the RV World - and they do an outstanding job of keeping us all informed!
Here it is.
Be sure to "adjust" your pods very gently and at a minimum each "adjustment"
Differences - House versus RV Plumbing?
A house type plumbing system pretty much takes care of itself. Water comes in from the city, pressurizes everything (including your water heater) goes down a common drain and away from you to a city sewer disposal plant or your own septic system.
Your RV Plumbing system needs to separate itself between Grey and Black Waste and water storage or constant city supply - remember, an RV is designed and built to travel and stay out on the road between "utility stops".
Use common sense when dealing with your RV Plumbing and you'll be fine!


